Learning to commit to version control
At this week’s computer-assisted reporting conference in Louisville, IRE has me doing double-duty. In addition to my class on OpenRefine, I’m also teaching a hands-on session on git and Github.
This assumes you’ve already downloaded git and created an account on Github. I use the command line, although if you master that, the GUI clients will be a piece of cake.
I’ve somehow, inadvertently become a bit of a Git evangelist, not out of any mastery, but mostly because of my convert’s zeal for version control. And the one-two punch of git and Github have changed the way I think about my job, web development and sharing knowledge. Here’s a quick run-through of the class. If you’re a visual learner, the slides are here: http://bit.ly/car13gitslides
What is git?
-
a distributed version control system (If this doesn’t mean anything to you, don’t sweat it. It’s mostly for the nerds)
-
a command line utility to track changes to a file and to share those changes with others.
-
good for any kind of text - stories, csv, html, .js, .py, .rb.
-
not so great with images, audio, video
What does git do?
In a broad oversimplification, it uses diff to compare every addition and subtraction in your code and shows you how your files evolve.
It lets you take snapshots of your code and roll through them over time (or back in time) as needed to follow how a file changes from save to save to save. And you can have several authors of a file branch off their own versions to edit and then later merge them all back together into one master file.

How does it work?
There’s a lot of things going on behind the curtain in git, that you can figure out eventually, but don’t worry about it here. For right now, basically you only need to really know six commands.
The first thing you want to know is
git statusThis will orient you to where you are, what files have changed and whether you’ve saved your snapshot of your project (which we’ll soon start calling a “commit”). This is your friend.
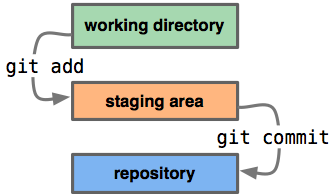
Where you work and where you edit your code is the working directory. When you’re ready to take a snapshot of your code, you “add” your file to the staging area.
git add foo.py
After you’ve made all the changes you want, and you’ve “added” all of your updated files to the staging area, it’s time to make a commit. And with each commit, you want to add a short message describing what the changes are.
git commit -m "finally debugged my own idiocy. maybe..."Now all of your updates are saved in your file respository, and if you want to, you can your snapshot is made. You could very easily stop here and just keep the audit trail on your machine. But the other half of this happy marriage is Github.
##What is Github?

Github is a social coding site, and it’s a hosted remote repository.
It lets you back up all of your code online (for free if it’s open source), and it lets you see how other developers do it and learn from their work.
Here’s how you do it:
git push -u origin masterYou “push” your code from the “master” branch that’s on your machine to your remote repository on Github, which we call “origin.” (This may have already been configured for you if you cloned your repo from github. Otherwise, you would have to
git remote add origin git@github.com:tommeagher/myrepo.git)
One of the many great things about Github is that you can see the diff in your files without the Matrix hypnosis of command line.
The last couple commands I’ll tell you are how you get your commits from the remote repository on Github back on your machine.
You can use
git fetch originto gather the updated files from your remote “origin” repository. Now you want to “merge” the changes from the master branch on your remote “origin” repository into your master branch on your machine.
git merge origin/masterNow your files are updated from the remote repository. Now keep coding.
If you want more, you can visit the repo for this class, where I have a cheat sheet for the most common basic uses and commands and more in-depth tutorials.
This really just deals with the basics. We haven’t even had a chance to talk about merge problems, branching, forking or cloning, but you know how to Google, so you can figure it out. Fork my repo, improve the cheat sheet and send me a pull request.
What’s your favorite tip or cheat in git? Leave me a comment. I’d love to read it.
